


Looking to launch your very own LearnDash online course marketplace?
With the rise of remote work and digital education, the demand for quality online courses has absolutely exploded. If you have knowledge and skills to share, an online course marketplace is a great way to teach students worldwide.

Now building a thriving eLearning marketplace does take work. But the right tools and strategy make it 100% doable to create something rewarding and wildly successful.
This guide shall teach you how to create great courses, support teachers, build a student community, and make an interesting platform. By the end, you’ll have clarity, confidence, and a proven plan of action to start teaching online your way. Let’s start building a custom online course marketplace!
What is a course marketplace?
First up, it helps to see a marketplace for online courses like a big virtual library. Instead of books, though, you’ve got courses created by different teachers on every topic imaginable. Students can search for courses based on different criteria such as category, author, language, and whether they are free or paid. This allows them to find the perfect class to join.
Now typically, the company hosting the LearnDash marketplace takes a cut of the instructor’s revenue per student enrollment. So to create a thriving online course creation marketplace, you really need to dial in three key elements:
- Make it super easy for instructors to create and upload courses. More courses mean more options for students.
- Have solid communication options set up for students to engage with teachers. Accountability and access help learning stick.
- Manage all the backend revenue tracking and payouts to instructors seamlessly. You want to make the money flow smoothly.
The good news is plugins like LearnDash make this way easier to pull off. Their LMS system is feature-rich to handle courses, and their add-ons integrate payments, messaging, and more. Having these optimized tools that all sync together is huge for efficiently running your marketplace.
Make life easy for teachers and students to succeed in a LearnDash marketplace.
LearnDash Overview
To make your website a successful online course business, use the Learndash WordPress plugin. It’s a great tool for this.
Learndash is a learning management system, aka an LMS. It simplifies teaching and learning for both educators and students. Learndash helps you make courses and quizzes and get feedback from students to share knowledge effectively.
Finding the right eLearning platform that aligns with your specific brand, content, and teaching style can be a challenge. You want all that customization and flexibility.
The good news is Learndash enables you to develop super-tailored learning experiences. You can personalize courses based on student skill levels, personalities, feedback, and more. Learndash also makes it easy to blend things like group discussions and one-on-one coaching with your course materials.
Learndash is a good choice if you want to start an eLearning business that matches your goals and teaching style. It can help make your vision come true. The personalization and modification options are limitless.
If you want to make courses and help students, Learndash can assist in building the online learning platform you’ve always wanted.

8 Steps to Make your online Course Marketplace with LearnDash
Do your homework first
Start by evaluating if there’s a real audience demand for your idea. Browse similar topics on course marketplaces to see what’s out there. Use keyword research to see what phrasing people search for. Stay on top of the latest trends and news in your field.
Next, get crystal clear on who your target students are. Build out detailed learner personas – name them, understand their goals, skill levels, etc.
Make it feel like you’re designing the course for just one eager student. Gather direct feedback too. Run surveys to see if your audience is genuinely interested and willing to pay. Keep it targeted to your personas. Scope the competitive landscape. See what peer educators’ courses offer and how they market them. Do a SWOT analysis on strengths, weaknesses, etc. Find your USP.
Synthesize your learnings into an action plan mapping out your course dev and promotion roadmap. Outline tasks, priorities, and deadlines. Basically, do the legwork upfront to validate your idea and pinpoint your positioning. Minimize guesswork so you can focus on rock-solid execution. Research conquers all! You’ve got this.
Pick a Name and Place to Host Your Site
When starting any website, the first steps are securing your custom domain name and web hosting plan. This lays the foundation to then begin building out your actual online course platform.
Your domain name is essentially the URL address people will type to access your courses. Make sure it’s short, easy to remember, and aligns with your brand; www.teknoflair.com, for example.
Web hosting maintains the server space to store all your site files and content. You’ll want fast, reliable hosting with great support in case issues arise. Many managed WordPress hosts like Bluehost, SiteGround, Hostinger, GreenGeeks, and Pressidium are perfect for hosting online course platforms.
Once you’ve purchased hosting, you can install WordPress with just a few clicks. The setup wizard makes it easy to connect your domain name to the hosting account.
While WordPress itself is free, open-source software, domains, and hosting require an investment. But it’s well worth it for the foundation of a high-quality, dependable site.
Take your time picking the perfect domain and host. This establishes your brand identity and ensures a smooth technical backend. With those pillars in place, you’ll be ready to start structuring your online courses!
Setup
WordPress
After getting your web hosting and domain name, you need to install WordPress, the software that runs your course site.
Most managed WordPress hosts have easy ways to set up WordPress for you, either with one-click installs or automated tools.
If you need to install WordPress manually, follow their official WordPress installation guide step-by-step. It’s pretty straightforward, but you do need to execute everything in the right sequence for proper configuration.
After WordPress is fully up and running, that’s when the fun really begins! Now you have your blank canvas and all the tools to start structuring your online course offerings.
Even if technology isn’t your strong suit, WordPress makes it very easy to get your site foundation in place. Take it slow, and don’t hesitate to contact your host’s support team if you need assistance.
With WordPress installed, you’ll now be able to start shaping your platform and courses. Onward!
LearnDash LMS plugin
Once your WordPress site is ready to go, it’s time to transform it into a full-featured online course marketplace. This is where a robust learning management system (LMS) plugin like LearnDash comes in.
LearnDash is one of the most popular and highly-rated LMS options for WordPress. It provides all the core functionality needed to create, deliver, and sell online courses, including:
- Easy course and lesson builders
- Quizzes and assignments
- Beautiful course pages
- Student reporting and tracking tools
- Certificate awards upon completion
- Payment processing capabilities
Thousands of businesses and individuals use LearnDash for their education sites, which speaks to its power and flexibility. And you can use it with any WordPress theme, though optimized education-focused ones integrate best.
Installation
Once you’ve purchased LearnDash, it’s time to get it installed & activated on your WordPress site:
- First, upload the LearnDash.zip file through the plugin installer in your WordPress dashboard. Follow the prompts to get it uploaded and enabled.
- Next, you’ll enter your LearnDash license key to register the plugin. You can find this under LearnDash > Settings > LMS License. Paste in your key and hit Update License.
- To charge for courses, go to PayPal Settings and enter your PayPal email, currency, and billing details for LearnDash payments.
- Make sure you’re running LearnDash 3.0, not the legacy version. The General tab under Settings lets you select the Active Template. LearnDash 3 unlocks the newest features.
- Speaking of, enable the Focus Mode here for a distraction-free student view that removes sidebars and widgets. This instantly upgrades course pages!
With LearnDash installed and activated, you now have full control to start structuring your online courses and monetizing content. Time to put your LMS superpowers to work!
LearnDash is a great option for turning your website into a successful online course hub. Educators use it to access necessary tools, and a strong community supports it.
WisdmLab’s Instructor Role plugin
Want to give course authors backend access without compromising site security? The WISDM Instructor Role plugin for LearnDash is perfect.
Features
Giving instructors frontend access to create and manage courses is crucial for a thriving marketplace. But you still need oversight as the site owner.
- Instructors can use LMS tools to add courses, customize content, communicate with students, and handle enrollments easily.
- Meanwhile, you retain full control of the backend WordPress dashboard to maintain site-wide authority. No worrying about instructors accidentally changing global settings or someone else’s courses.
- Student-to-instructor messaging stays seamless too. No need to switch between separate inboxes. All queries and forum activities stay organized within the frontend learning portal.
- You can also automate accurate revenue share payouts to instructors directly through the LMS platform. Set customized percentages so they earn fair compensation.
The key is striking the ideal balance of instructor empowerment with site owner oversight and automation. With the right setup, everyone succeeds!
Installation
Here’s how to install it:
- First, purchase and download the plugin file from the WISDM website.
- You can then upload it directly in your WordPress dashboard under Plugins > Add New.
- Click Upload, choose the file, and Install Now.
- Alternatively, you can also use FTP to upload the instructor-role folder to wp-content/plugins.
- Log into your host and transfer the folder there.
- Once uploaded via either method, head to Plugins and activate Instructor Role. This adds the plugin functionality to LearnDash.
- Next, enter your valid license key under WisdmLabs License Options > Instructor Role to enable automatic updates. And that’s it!
You’re all set to start assigning course authors limited privileges to create content while restricting broader site access. Adding multiple instructors is a security breeze with the WISDM Instructor Role add-on.
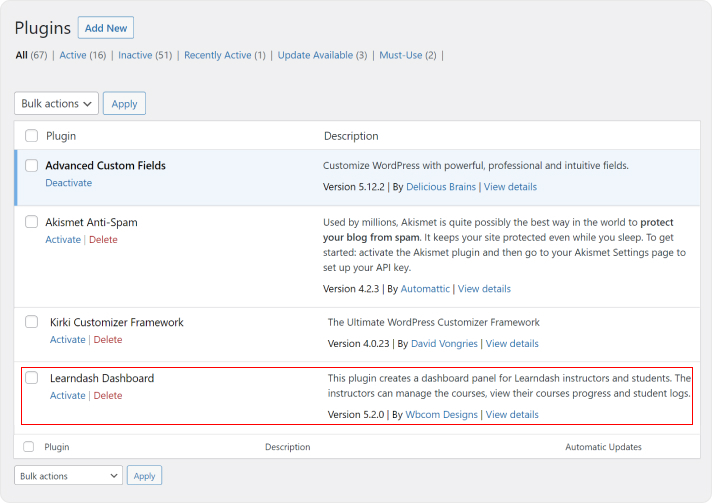
WBComDesign’s LearnDash Dashboard
The Learndash Dashboard plugin makes tracking course progress and engagement a breeze. It’s another great option for an online course marketplace.
Features
The Learndash Dashboard plugin is all about empowering instructors and streamlining course management – no need to touch the WordPress backend.
- With the frontend course builder, instructors can create and organize lessons, quizzes, topics, and assignments entirely from the student-facing portal.
- Teachers have personalized dashboards to track students’ progress, quizzes, assignments, and course analytics without needing admin access.
- For students, their dashboards display enrolled courses, status, messaging with instructors, and activity records. Really helpful for engagement.
- The private messaging and bulk email features facilitate student-instructor communication seamlessly within the platform. No need to jump around inboxes.
- Advanced reporting provides insightful data for admins, instructors, and group leaders to easily track student progress and course results.
- Learndash Dashboard allows multi-instructor sites to easily manage commissions and withdrawal requests, boosting their earning potential.
The key advantage is keeping the WordPress backend complexity hidden while offering intuitive course administration and insights upfront. Super valuable!
Installation
- First, purchase the plugin from Wbcom Designs and download the .zip file from your account.
- You can then upload the zip to your WordPress site via FTP into the /wp-content/plugins/ directory.
- Alternatively, log into your WP dashboard and go to Plugins > Add New. Click upload, then choose the Learndash Dashboard zip file.

- Follow the prompts to get the plugin uploaded and activated. And that’s it!
Admins, instructors, group leaders, and students can now use personalized Learndash dashboards to announce, track courses, review quiz attempts, and more. Learndash Dashboard takes your LMS functionality to the next level.
Deciding Between Instructor Role and LearnDash Dashboard
When setting up a LearnDash LMS with multiple instructors, two popular plugins can enable frontend course management:
- WisdmLab’s Instructor Role gives instructors a focused editor role to create/manage their own courses only. But it does not include extra features like messaging or reporting.
- WBComDesign’s LearnDash Dashboard provides instructors with a full dashboard, including analytics, messaging, withdrawal requests, etc. But requires more onboarding for the expanded tools.
Instructor Role works well if you just need to segregate course authorship. It’s simple and locks down the WordPress backend.
LearnDash Dashboard is better if you want to empower instructors with insights and communication features beyond just content creation. It’s more robust but complex.
Consider your team’s needs and technical savvy. For basic course authoring, the Instructor Role gets the job done. If you want to maximize capabilities on the front end, LearnDash Dashboard is likely the better pick.
Picking the Perfect eLearning Theme
With WordPress and LearnDash set up, it’s time to choose a theme to bring your online course vision to life. The right theme establishes the look, feel, features, and functionality of your site.
Since themes are the backbone of any WordPress site, picking one optimized for eLearning is crucial. You want a theme that:
- Integrates seamlessly with LearnDash for a smooth experience
- Allows you to easily create an engaging course marketplace
- Enhances student learning with great design and interactivity
- Provides the functions and speed you need
The good news is that WordPress has tons of theme options. Some stellar eLearning-focused choices that work great with LearnDash include:
Do some research to decide which theme’s layouts, customization options, and features fit your goals best. Preview demos to get a feel for each one.
Just be 100% sure whichever theme you select is fully compatible with LearnDash. This ensures optimal performance as you build out your course platform.
The right theme brings your educational vision to life visually and functionally. It’s worth taking time to find the perfect fit! Learn more about choosing a suitable theme for your e-learning marketplace here.
Course Creation
Import Demo content to set up initial courses
Starting an online course site from absolute scratch can take a ton of time and effort. Designing the site architecture, coding up courses, configuring menus – it’s a lot of work!
However, the eLumine theme we suggested earlier lets you kickstart your course platform almost instantly with their ready-made demo site. We’re talking minutes rather than months of setup.
The eLumine demo gives you a fully functional foundation to build on top of:
- It already has a dialed-in elegant design, so you don’t need to start from a blank page.
- We create sample courses, lessons, and topics so you can see how we structure them.
- The homepage, menus, student profiles – it’s all preset and ready to go.
All you need to do is swap in your own content in place of the demo stuff. Keep what you like, tweak, and customize to your needs.

In no time at all, you’ll have a polished, professional course site up that you can continually develop. But getting started quickly relies heavily on that initial framework.
The bottom line is don’t reinvent the wheel when eLumine’s demo site can give you a serious headstart! You’ll save tons of time and can focus on what matters most – creating killer courses.
Courses Creation with LearnDash
Now Comes the Fun Part; that is Building Your Online Courses!
Okay, your website foundation is solid. The theme appears slick; you have set up the site pages and menus. Time for the best part – adding all your amazing online course content!
This is where LearnDash shines. With its incredibly intuitive course builder, creating lessons and modules is as easy as dragging, dropping, and customizing. You can offer single stand-alone courses or multi-tiered bundles that students progress through – whatever suits your goals.
- You manage all courses under LearnDash > Courses inside your WordPress dashboard.
- Click any existing course title to edit, or select Add New to create a course from scratch.
- When adding a new course, start by naming it and writing a short description. You can upload an eye-catching featured image too.
- Under Settings, customize options like attached course materials, certificates upon completion, prerequisites, and more. Get it all just how you want. Pro Tip: Publish as you build, so you don’t lose any work if there are tech hiccups.
- A key step is setting who can access the course. You can make it public to anyone, even non-registered site visitors. Or charge a one-time or recurring fee for enrollment under “Buy Now” pricing options.
Building and tweaking your courses is where the magic happens! Let your passion and knowledge shine through quality content that inspires students to learn. You’ve got this!
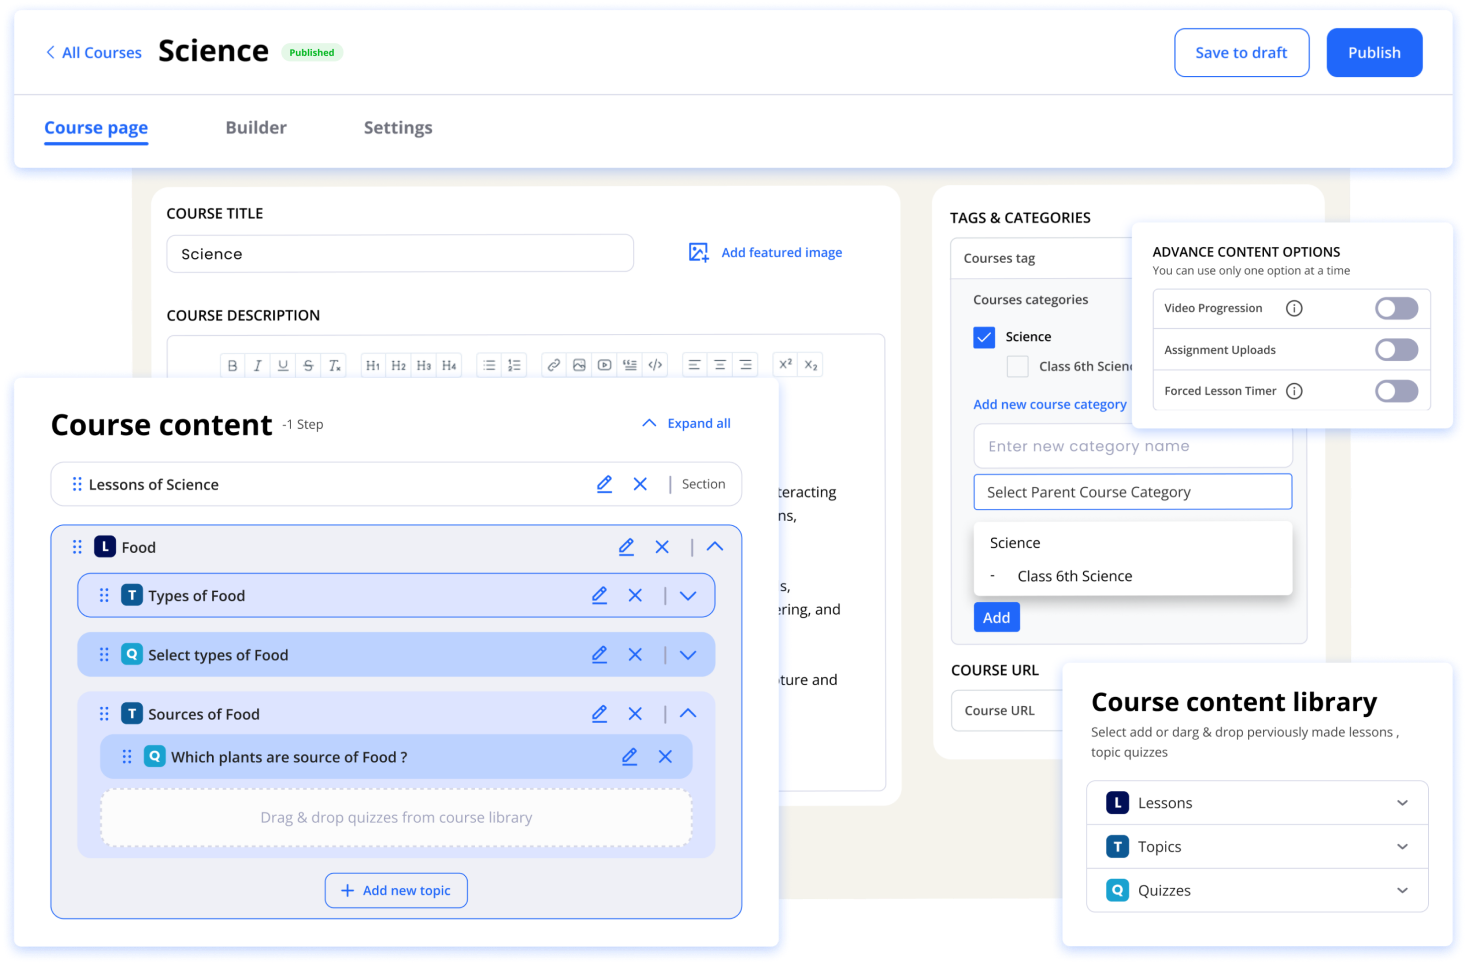
Filling Your Course with Sections
You’ve got your course setup looking slick – time to build out the actual lessons and content your students came for!
- Inside the course builder, start by adding Section Headings to organize topics and flow, like chapter titles dividing up a book. You can’t add material directly to sections; just use them to arrange.
- Then click New Lesson to actually build the meat of your course. Add lessons in any order, and reorganize easily by dragging and dropping. You can also add lessons under LearnDash > Lessons.
- To add content to a lesson, click the Edit button while hovering over it. This opens the lesson editor to add text, images, videos, and assignments – customize completely!
- Under the Settings tab, enable options like video progression for video lessons, allow student assignments, and control lesson accessibility.
- Manage student access under the access settings. You can even set lessons to drip release based on days after enrollment with the super cool drip feed function.
The LearnDash builder empowers creating any course structure imaginable while handling the heavy lifting. You focus on developing standout lessons that help students reach goals.
Build out an amazing course at your own pace. And don’t forget to hit Publish so none of your hard work disappears!
Engage Students with Interactive Lesson Assignments
Want students to apply lesson concepts or demonstrate comprehension? Easily add graded assignments within LearnDash lessons.
- Edit any lesson, and under the Settings tab, enable “Assignment Uploads.” Configure file types, size limits, points, and manual or automatic grading.
- In the lesson content, include clear instructions on the activity or project to complete. Students will see the assignment prompt when finishing the lesson.
- You can view all submitted assignments under LearnDash > Assignments on the backend and share feedback.
Setting lesson assignments allows learners to get hands-on while letting you gauge understanding. Make them fun and creative! Optional assignments also give students control over diving deeper. Support different learning styles with these interactive activities.
Break Long Lessons Into Bite-Sized Topics
Got a packed lesson that’s becoming information overload? No worries, easily break it into smaller focused topics. This improves the flow of students.
- Add your first topic under LearnDash > Topics > Add your first topic. Then continue adding more using Add New.
- Topics work just like lessons – customize with a title, featured image, and any content like text, visuals, or video embeds.
- Under Settings, enable options, including attached materials, assignments, video progression timers, and more.
- You can assign each topic to a specific course and lesson it belongs to under Topic Access Settings.
With topics, students digest material better in compact segments versus marathon lessons. Structure your expertise into user-friendly chunks! Short, focused topics also optimize site speed vs lengthy pages. Take advantage of them to enrich learning and site performance.
Engage Students with Quizzes and Assignments
Want to gauge student progress and reinforce learning? LearnDash makes it easy to create quizzes and assignments.
- Add a new quiz under LearnDash > Quizzes > Add New. Title your courses, then customize settings like passing scores, certificates, question quantity, time limits, and more in Settings.
- You can assign quizzes to specific courses/lessons and enable prerequisites under Quiz Access Settings.
- To build the questions, navigate to LearnDash > Quizzes and select Questions for the desired quiz. Click the buttons to add questions. In the editor, you can enter the question, point value, correct answer feedback, and wrong answer feedback.
- Then pick from question types like multiple choice, fill in the blank, essay, etc. Each type has additional specialized settings.
With smart settings and engaging question types, you can design tests that genuinely measure comprehension and challenge learners. Building great quizzes and assignments is rewarding for both students and you! Try different response formats to keep it lively. Learn more about adding gamification to your online course marketplace here.
Empower External Instructors to Create Their Own Courses
A key step in building a thriving course marketplace is letting multiple instructors author and manage their own classes.
Option 1
The WISDM Instructor Role plugin we mentioned earlier for LearnDash makes this easy – it allows creating unlimited instructors with specialized permissions.
- These instructors can create full courses, lessons, quizzes, and materials while only accessing their own content – not global admin tools.
- Instructors can also enroll students, communicate within the LMS, approve assignments, and track grades for their courses. But your site admin privileges are secure.
- Creating detailed instructor profiles showcases instructors’ expertise and personality, building student trust.
- The plugin also includes an intuitive Frontend Course Creator so instructors can build and organize courses without needing WordPress expertise. Super user-friendly!

With the WISDM Instructor Role add-on, you can smoothly onboard subject matter experts, trainers, teachers, and external course authors. Empower as many instructors as your marketplace needs while restricting broader access – the perfect balance!
Option 2
The LearnDash Dashboard plugin gives instructors frontend access to create full courses without admin privileges.
- Instructors get intuitive dashboards to monitor students, send messages, approve assignments, generate reports, and handle enrollment. Site owners retain backend oversight.
- For students, their dashboards neatly organize courses, progress, grades, and instructor communication. Very user-friendly!
- The plugin also enables streamlined instructor registration right from the front end to easily onboard new teachers.
- LearnDash Dashboard is essential for multi-instructor sites as it allows for customized permissions, automated commission tracking, and student management.
It allows your marketplace to scale while keeping the student experience optimized. A true win-win!
Foster Student-Instructor Connections via Communication Tools
For an online course to thrive, robust communication between students and instructors is crucial. Some strategies to build bonds:
- The WISDM Instructor Role plugin enables direct messaging so instructors can provide 1-on-1 support and feedback.
- BuddyPress adds social profiles, groups, and activity feeds to your courses. Instructors can send bulk emails for announcements from the LearnDash Dashboard. For discussions and questions, BuddyPress facilitates private messages between students and teachers.
- The PeepSo Add-on creates interactive profiles, activity streams, and groups tied to your classes. This allows instructors and students to connect beyond just coursework. With PeepSo, learners can share progress updates, motivate each other through friendly competition, and forge bonds around shared interests.
- Dedicated profile tabs give visibility into courses in progress, completed certificates, instructor status, and more. For instructors, facilitating discussions and networking through PeepSo groups tied to their classes is seamless.
- The LearnDash Notes add-on lets students take annotated notes on courses, with instructors able to provide feedback.
With profile pages, groups, messaging, and shared notes space, you create connectedness online reminiscent of real-life classes. Fostering an open channel for discussions, questions, and connectivity is so important for effective digital learning and student success. Take advantage of tools that recreate campus-like social bonds in your online marketplace. Communication and community matter!
Streamline Group Enrollments
If you offer courses to cohorts like classrooms or corporate teams, WISDM’s Group Registration plugin is invaluable.
- It allows bulk course enrollment for an entire pre-defined group versus individual signups. Group leaders can purchase and manage access.
- This saves course buyers like teachers or managers a huge amount of time versus enrolling in a classroom or department one by one.
- The purchaser automatically becomes the leader who can then add/remove students, oversee progress, communicate, and more. Instructors can also be designated leaders.
- For you as the site owner, it means faster sales and happier customers who can onboard full groups seamlessly.

The WISDM add-on uniquely supports and simplifies group learning in academic institutions and businesses. Facilitate easy cohort-based learning at scale while making group leaders’ lives easier!
Build Community with Forums and Groups
Creating a thriving course marketplace goes beyond just course delivery – it’s also about fostering community.
Adding discussion forums and student groups spurs engagement and connectedness. With a sense of community, learners are more invested long-term.
A plugin like bbPress allows you to launch subject-specific forums tied to courses. This facilitates topic-focused discussions and ideation between students. Instructors can also easily create student cohorts for group assignments, collective learning, and brainstorming teamwork.
Healthy peer-to-peer interactions boost enjoyment of your platform while building knowledge. Students feel less isolated and more supported. Don’t underestimate the importance of community alongside coursework! Forums and groups cultivate belonging and collaboration, with huge benefits.
Monetize Your Marketplace and Configure Payment Gateways
Once you’ve built a solid course marketplace, it’s time to start monetizing! Here are tips on earning through course sales and setting up hassle-free payments.
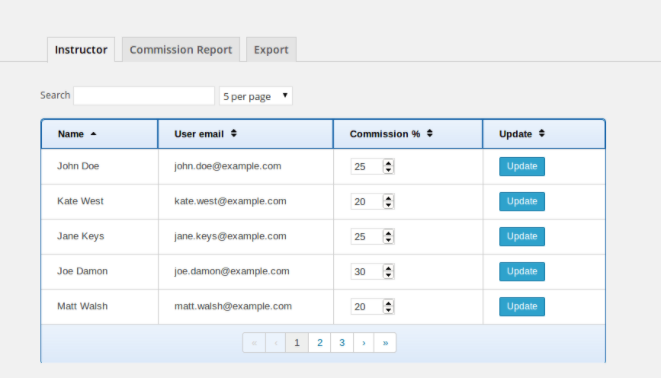
- As the site owner, you can take a small commission percentage from each course sold.
- Instructors earn the remainder per student enrollment. The WISDM Instructor Role add-on handles tracking commissions and managing instructor payouts easily. Set custom percentages per instructor.
While LearnDash supports PayPal payments, consider adding other gateways like Stripe for more options.WooCommerce also enables discounts, bundles, and physical sales.
With efficient payment processing and automated commission tracking, you can easily increase your earnings as your courses and student numbers grow.
You have crossed a major hurdle by establishing the core functionality to conduct and get paid for courses. Pat yourself on the back.
Add More LearnDash Add-Ons to Level Up Your Course Marketplace
Beyond the core functionality, many handy plugins can further optimize and distinguish your LearnDash course marketplace.
- A memberships plugin lets you create tiered membership levels like Beginner, Intermediate, and Advanced. You can then map specific courses to each level for a structured learning path.
- For data-driven instruction, the WISDM Reports add-on provides quiz analytics and detailed student performance tracking to inform teaching approaches.
- Collect information seamlessly at signup with the custom forms plugin. Auto-enroll users or gather marketing consent.
- An email marketing integration lets you build subscriber lists to nurture leads and promote new course launches through campaigns.
As your marketplace grows, consider adding any combination of these plugins to open up new capabilities. The right add-ons take your platform to the next level! Start with the most pressing needs, and build from there.
Get the Word Out: Marketing Your Online Course Platform
You’ve put in the work to build an amazing online course marketplace. But now it’s time for the equally important step – getting students to your site! A strategic marketing plan is key. Here are 3 essential channels to focus on:
Email Marketing
Build an email list to consistently nurture leads. Send promos on new course launches, discounts, and platform updates. Email converts and retains students better than any other channel.
Content Marketing
Create a blog sharing your expertise through articles, tutorials, and videos. Valuable content attracts organic search traffic, positions you as an authority, and convinces visitors your courses are worth buying.
Landing Pages
Dedicated landing pages targeted to promotions, like a new course release, increase conversion rates. Optimize pages to compel visitors to enroll with elements like course details, pricing, testimonials, and calls to action.
Promoting your platform takes dedication, but maximizing these three avenues provides huge dividends. Develop your marketing plan, focus on quality content and conversions, and continue expanding your reach.
Best Online Course Marketplaces
Building an online course? Don’t go it alone – tap into the power, of course, marketplaces!
Platforms like Udemy and Skillshare connect you with eager students in just about any topic imaginable. They handle all the marketing so you can focus on creating killer courses.
Other great picks are PluralSight for tech skills, LinkedIn Learning for professional development, and Udacity for specialized nano degrees.
The key is finding one that fits your audience and teaching style. Take time to explore the different catalogs and see which resonates most.
These platforms empower you to share your expertise through customizable course pages while handling the heavy lifting of student management.
So don’t keep your knowledge to yourself! Check out the options and get your course up on a marketplace that can help it thrive. Teaching online is incredibly rewarding, especially with a partner, to maximize reach.
Bring Your Online Courses to Life with TeknoFlair
You have the knowledge. Now reach students worldwide through your own thriving course marketplace.
With 10+ years of WordPress expertise, TeknoFlair helps you launch your successful online course marketplace. Let us guide you step-by-step:
- Researching your course ideas
- Choosing the perfect domain and hosting
- Installing and configuring LearnDash
- Selecting an optimized theme
- Creating engaging course content
- Empowering multiple instructors
- Integrating payment systems
- Marketing your platform for growth
TeknoFlair’s customized blueprint will turn your vision into a fully-functional course hub that converts visitors into passionate learners.
Don’t just dream it – build it!
Contact TeknoFlair today to bring your online course marketplace to life.

Frequently Asked Questions
How to build an online course marketplace?
To build your online course marketplace website:
- Get hosting and pick a great domain
- Install WordPress to power your site
- Add a robust LMS plugin like LearnDash
- Choose an integrated eLearning theme
- Import demo content to kickstart courses
- Onboard instructors to create courses
That covers the core foundation! With the right tools like LearnDash and a polished theme, you can create a thriving course marketplace.
Focus on amazing content, marketing, and continuous improvements after launch.
How can I build and sell online courses at a low cost?
Udemy and Skillshare offer affordable packages to build and host your material. Teachable has a forever-free option too. You can also use free presentation tools like Canva and Google Slides to craft engaging content on a budget. And leverage social promo through Facebook, Instagram, and TikTok to attract enrolled without paid ads.
What platform is the best to create and sell online courses?
Thinkific and Teachable are leading all-in-one platforms with intuitive course builders and marketing tools. Kajabi offers robust membership site capabilities alongside courses. Udemy and Skillshare enable reaching broad student audiences.
Podia specifically focuses on marketing automation and conversions. Evaluate your goals, ideal course format, budget, and must-have features. Comparing a few providers is wise to determine the best fit for you.
How to sell an online course to 1000 clients?
Achieving this big goal is definitely possible with the right strategy.
- Start by choosing a topic with proven demand – research winning niches.
- Develop truly high-value content – well-organized, engaging, with multimedia.
- Price competitively based on the market for similar courses.
- Heavily promote through social media, paid ads, email marketing, and other channels.
- Launch to a small group first to gather feedback, then improve and refine before scaling up.
- Stay focused on providing incredible student outcomes, and be persistent.
With solid content and savvy marketing, you can absolutely hit that 1000-student milestone!
What is the best WordPress theme for LearnDash?
Choosing the right theme is key for an engaging LearnDash course website. Some top options to consider:
- Astra – Extremely robust and optimized for LearnDash with over 1.6 million installs.
- BuddyBoss – Focused on building online learning communities with pre-built templates.
- eLumine – Premium theme competitively priced with stellar LearnDash integration.
- Kadence – Drag-and-drop editor for unique designs, even if not purely eLearning-focused.
Evaluate demos and features to find the best fit for your site goals and audience.
Can I sell my online course with my own e-commerce site?
Teachable, Heights, and Thinkific provide tools for creating, promoting, and selling courses on your website. They make it super easy to get up and running.
WordPress with WooCommerce is another solid choice if you want to fully customize your site. You can handpick themes, plugins, and integrations tailored to your goals. It’s a little more hands-on but gives you total control.
How to find affiliates for selling online courses?
- First, join big affiliate networks like Impact or Linkshare to connect with tons of partners ready to promote your course.
- Next, reach out directly to relevant bloggers and influencers about teaming up. Affiliate deals give them a cut for spreading the word.
- You can also build your own affiliate program right on your course website. Offer students incentives to share their courses with friends.
- After your program is up and running, promote it actively on social media, email, and anywhere your audience hangs out.
Is WordPress good for setting up an online course?
Absolutely – WordPress is a fantastic way to create your own online courses! It’s super popular, powering over 40% of all websites. You really can’t go wrong with it.
The beauty of WordPress is that you can totally customize things and make the site your own, even without tech skills. There are plugins that make it super easy to build and manage courses too.
LMS plugins like LearnDash and LearnPress provide all you need to make lessons, quizzes, and assignments – all for a complete course. And the best part is you can start with just a small investment.
Key Takeaways on Creating a Thriving Online Course Marketplace
- Use LearnDash to handle the heavy lifting of course creation, delivery, and monetization. Its intuitive builder and array of add-ons are invaluable.
- Choose a polished theme like Astra, BuddyBoss, eLumine, or Reign LearnMate for seamless design and LMS integration.
- Kickstart content fast by importing demo courses, then customize. Create engaging lessons, topics, assignments, and quizzes.
- Use plugins like WISDM Instructor Role or LearnDash Dashboard to empower multiple teachers to author courses.
- Foster student community with forums, groups, social networking integration, messaging, and shared profiles.
- Configure payment processing with PayPal plus additional gateways like Stripe. Automate instructor commission tracking.
- Promote your platform through email marketing, SEO content, and conversion-focused landing pages. Continue expanding reach.
- Add capabilities like tiered memberships, performance analytics, social sharing, lead generation, and email marketing through handy add-ons.
With the right tools and strategy, you can build an online course marketplace that transforms lives through education and earns income. Follow this blueprint for success!
I am a professional copywriter helping businesses transform into brands using creative wordsmithery with a dash of rhetoric and creativity.